How to safely catch a bat in bedroom spaces without risking family health
A step-by-step wildlife protocol detailing safe capture methods, exclusion tools, and emergency health guidelines.
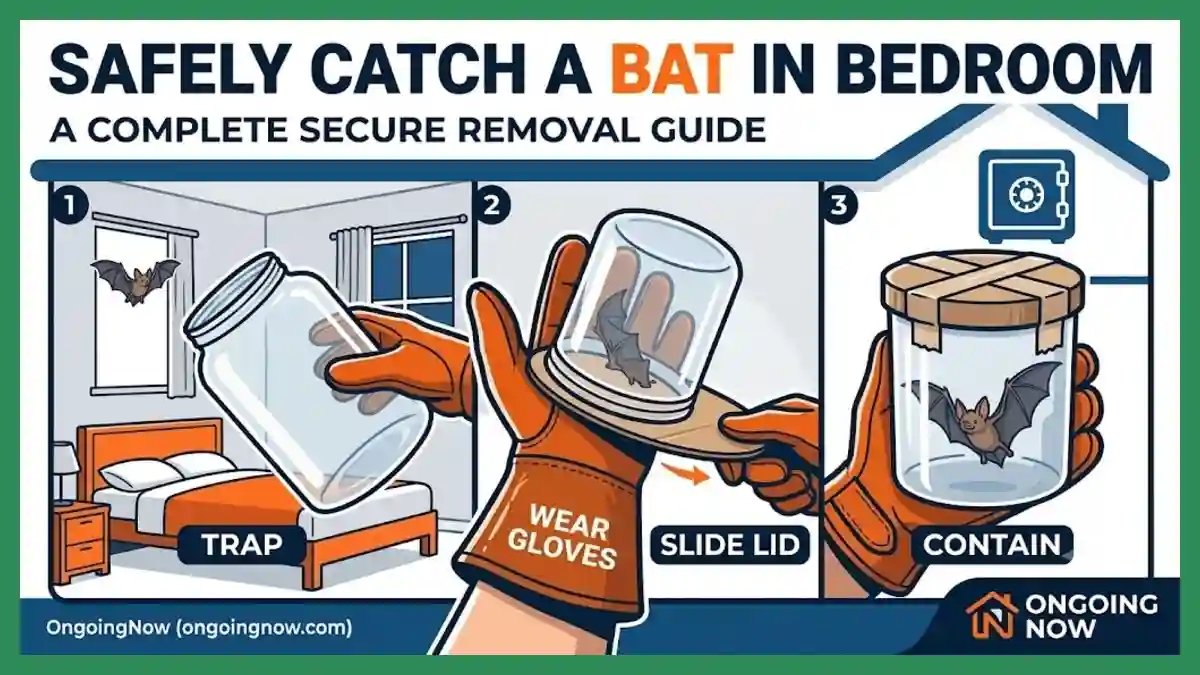
Encountering a wild animal indoors can be a stressful experience that requires immediate, careful action. Knowing how to safely catch a bat in bedroom spaces is essential for protecting household residents while respecting local wildlife regulations.
This guide provides a structured overview of safe handling protocols, exclusion methods, and public health guidelines.
Quick Answer: Essential Actions
Isolate the Room: Close all doors and windows leading to the rest of the house to keep the animal contained.
Avoid Direct Contact: Never touch wildlife with bare hands; always prioritize personal protective equipment.
Determine Exposure: If a bite or scratch is suspected, contact local public health officials immediately for testing instructions.
Step 1: Assess the Situation and Prep the Area
When a bat is discovered inside a living space, the immediate priority is containment and safety. Do not attempt to chase or swat at the animal, as this can cause it to fly erratically or sustain injuries that make handling more dangerous.
First, ensure all pets and children are removed from the room immediately. Close any interior doors leading to hallways or other rooms to prevent the animal from moving deeper into the house.
If you plan to allow the animal to exit on its own, open a single exterior window and leave the room, closing the door behind you. Turn off the lights, as these animals rely on echolocation and natural light cues to find their way out.
+-----------------------------------------------------------------+
|                    INITIAL RESPONSE CHECKLIST                   |
+-----------------------------------------------------------------+
|  [ ] Remove all pets and children from the area immediately.    |
|  [ ] Close all interior doors to prevent household migration.  |
|  [ ] Turn off overhead lights to minimize animal agitation.     |
|  [ ] Put on thick, protective clothing before proceeding.       |
+-----------------------------------------------------------------+
Step 2: Use the Container Method for Safe Capture
If the animal does not leave on its own, it must be contained. The step by step bat capture protocol container method is the safest manual removal strategy recommended by wildlife professionals.
Required Materials
A large plastic tub, coffee can, or sturdy box
A flat piece of rigid cardboard or plastic lid larger than the container opening
Heavy-duty protective hand wear
Executing the Capture Protocol
Wait for the Animal to Land: Do not attempt to capture a flying animal. Wait until it rests on a wall, curtain, or flat surface.
Place the Container: Gently and slowly place the open container over the animal, trapping it against the surface.
Slide the Lid: Carefully slide the rigid piece of cardboard or plastic between the container and the wall, ensuring the animal moves inside without its limbs getting pinched.
Secure the Structure: Hold the cardboard firmly against the container as you lift it away from the wall, then tape the lid down securely.
Important Safety Note: Always ensure you are wearing leather gloves for bat handling safety before initiating this protocol. Even small wildlife can bite through thin materials like latex or cloth.
Step 3: Prevent Injury to the Specimen
When managing an indoor wildlife situation, the physical state of the animal matters significantly for public health protocols. Capturing indoor bat without damaging head structures is critical if rabies testing is required.
Local diagnostic laboratories rely on intact brain tissue to run accurate diagnostic panels. Rough handling, hitting the animal with household objects, or using heavy traps can compromise the sample and prevent authorities from confirming whether rabies exposure occurred.
Using the smooth, wide opening of a plastic container minimizes physical trauma. Avoid using nets with wide mesh where the animal’s small bones can catch and fracture, and never use sticky traps or glue boards inside living areas.
Step 4: Understand Public Health Protocols
If a household member woke up in the room with the animal, specific health policies apply. Knowing what to do if bit by bat while sleeping is vital, as small teeth can leave wounds that go unnoticed.
Medical professionals treat any waking encounter in a room with a bat as a potential exposure event. Wash any suspected area thoroughly with soap and water for at least 15 minutes, and seek immediate medical evaluation.
+-----------------------------------------------------------------+
|                    POTENTIAL EXPOSURE PATHWAY                   |
+-----------------------------------------------------------------+
|  [ Animal Discovered in Bedroom ]                               |
|                 │                                               |
|                 ▼                                               |
|  [ Check for Waking Exposure / Physical Contact ]               |
|                 │                                               |
|        ┌────────┴────────┐                                      |
|        ▼                 ▼                                      |
|   ( No Contact )    ( Contact / Slept in Room )                 |
|        │                 │                                      |
|        ▼                 ▼                                      |
|   [ Safe Release ]  [ Avoid Release / Contact Health Dept ]    |
|                          │                                      |
|                          ▼                                      |
|                     [ Secure Specimen for Testing ]             |
+-----------------------------------------------------------------+
If exposure is suspected, do not release the animal outside. It must be kept secure so local authorities can initiate the public health bat testing submission guidelines to determine if post-exposure prophylaxis is necessary.
Step 5: Professional Removal and Cost Expectations
When self-capture is not feasible or safe, professional intervention becomes necessary. Homeowners should know how to contact an animal control bat removal emergency contact, which can include municipal animal control officers, local law enforcement non-emergency lines, or private wildlife control operators.
The cost of emergency bat removal services varies based on several regional and situational factors:
| Service Type | Estimated Cost Range | Key Factors Influencing Price |
| Emergency After-Hours Extraction | $200 – $500 | Time of day, travel distance, urgency |
| Standard Single-Animal Removal | $100 – $300 | Accessibility of the room, capture difficulty |
| Full Home Inspection & Assessment | $150 – $400 | Size of home, attic accessibility, damage level |
Private wildlife companies typically charge higher rates for holidays, weekends, or late-night dispatches, but they provide specialized equipment and immediate response times.
Step 6: Implement Long-Term Home Proofing
Once the immediate threat is resolved, the focus shifts to long-term prevention. Homeowners should utilize a cdc bat proofing home checklist instructions to ensure no further entry occurs.
Exclusion should only be performed during appropriate seasons—typically early spring or autumn—to avoid trapping flightless young inside the structure. Inspect the exterior of the home for any openings larger than a quarter of an inch, paying close attention to rooflines, chimneys, and vents.
Step 7: Seal Common Attic Entry Points
Attics are the most frequent nesting sites for urban wildlife due to their warmth and isolation. Learning how to seal attic entry points from bats requires durable materials and meticulous execution.
Effective Materials for Exclusion
Galvanized Hardware Cloth: Use 1/4-inch mesh to cover large vents and openings.
Heavy-Duty Caulk or Foam: Apply weather-resistant sealant to small cracks around construction joints.
One-Way Exclusion Devices: Install these over main exit holes so animals can leave but cannot re-enter.
Exclusion tubes or netting should remain in place for at least five to seven days to ensure all animals have exited the structure before permanently sealing the final opening with hardware cloth or flashing.
Key Takeaways
Safety First: Never handle wildlife without thick leather gloves and proper containment tools.
Preserve the Specimen: If exposure is possible, capture the animal without damaging its head so public health testing can be conducted.
Professional Help: Use emergency removal services if the situation poses an immediate health risk or if the animal cannot be safely reached.
Preventative Maintenance: Seal all exterior openings larger than a quarter-inch using durable materials like hardware cloth and silicone caulk.
Conclusion
Managing an indoor wildlife encounter requires a calm, systematic approach to ensure safety and regulatory compliance. By understanding how to safely catch a bat in bedroom environments using the container method, homeowners can successfully mitigate immediate risks. Long-term proofing and professional consultation remain the most reliable ways to maintain a secure, healthy household.
Stay sharp with Ongoing Now!
Source and Data Limitations: This guide is compiled from generalized wildlife conservation methodologies, standard public health recommendations, and typical regional pest control pricing structures. It does not reflect specific local city ordinances, county health department codes, or real-time changes in local emergency service fees. This is for informational purposes only and not personalized advice. Consult a qualified professional for your specific situation.